EnvisioKnit User's Manual
Download a print-friendly version (PDF).
Table of Contents
- Getting Started
- The Chart Editor
- The Pattern Editor
- The Yarn Studio
- Stitches
- Printing and Exporting
- Settings
- Tools
- Hotkeys and Shortcut Keys
- Other Features
Instruction Mode

Instruction Mode (Flat knitting)
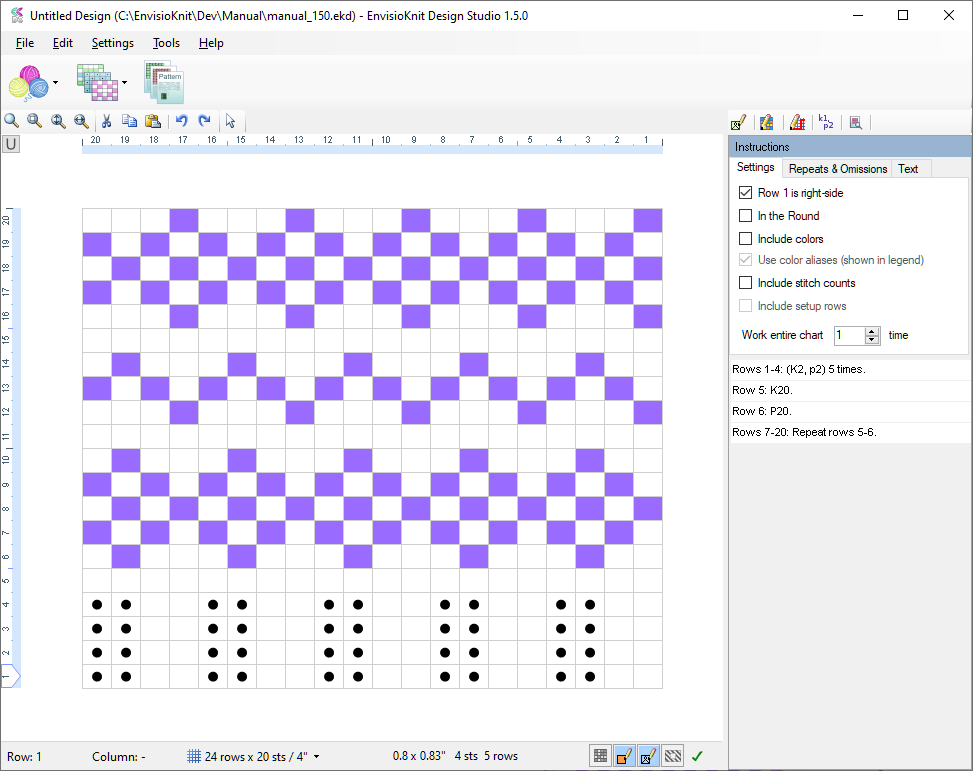
The Instruction Mode displays the written instructions for your chart and provides several options to determine how they should be generated. The options are listed on the right, above the instructions. The instructions are generated automatically and are continuously updated as you design.
Starting on Right or Wrong side
The Row 1 is right-side option specifies whether the first row of the chart is a right-side row. If the chart is worked flat, then the row following the right-side row will be a wrong-side row. If the chart is worked in the round then all the rows will be either right-side or wrong-side, as determined by the setting for the first row.
Working In the Round

Changing Instructions generated in the Round
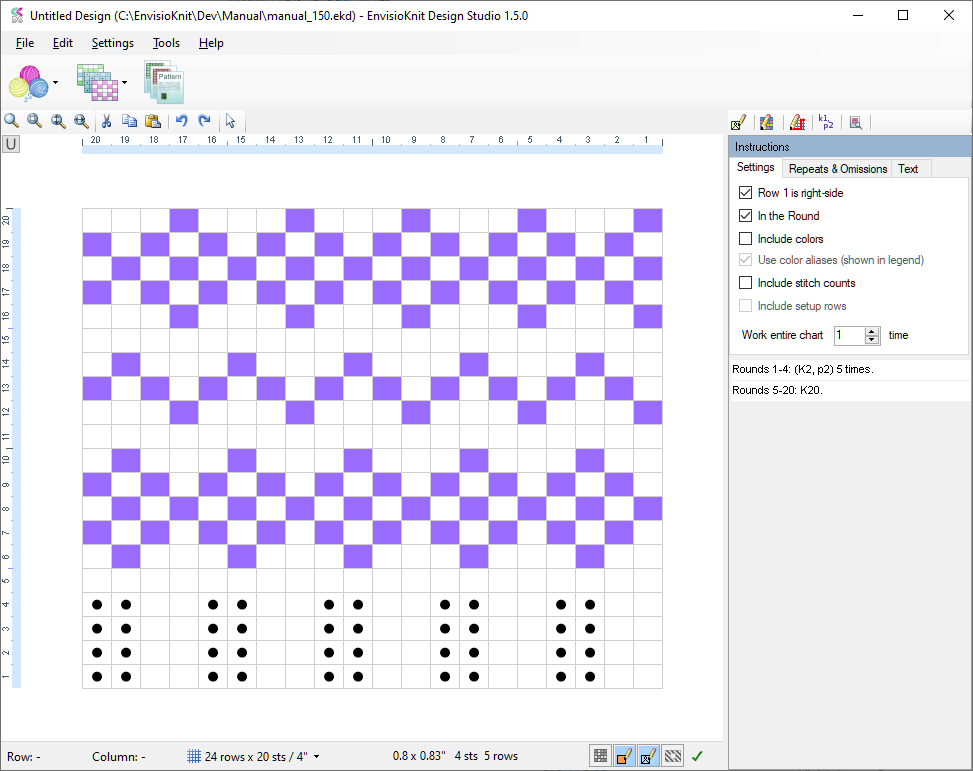
The In the Round option determines whether the instructions are generated for working the chart flat or circular. If set, instructions are generated in the round (circular). Otherwise, they are generated for flat knitting.
Colorwork

Generating Colorwork Instructions
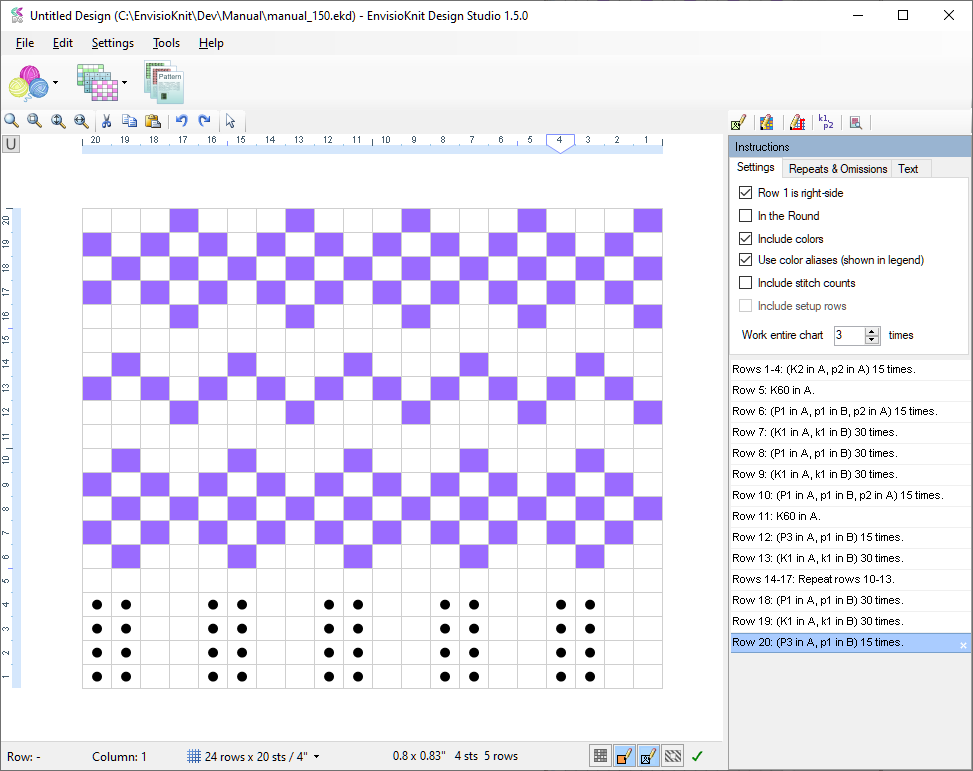
By default, written instructions are generated only for the stitch pattern and color changes are omitted since they are shown in the chart. The Include Colors option can be set to include colors changes in the written instructions. The Use Color Aliases option can be used to represent the yarn colors with letters (i.e. A, B, C...). If this option is used, the letters corresponding to each yarn color will appear in the yarn legend. Unsetting Use Color Aliases will generate the colorwork instructions using the full name of each yarn. For complex colorwork charts, you may find that using aliases for the colors helps simplify and shorten the instructions.
Chart Repeats

Instructions Repeated 3 Times
The instructions can be generated to repeat the chart a specified number of times. By default, the instructions are generated for each row in the chart to be worked once. Setting the Repeat Chart number will generate instructions for working the chart the number of times that you set. For example, if you have a row of 20 knit stitches and you set Repeat Chart to 3 times, the corresponding instructions will read K60. This option is handy if you have a chart that is repeated across several times and only want to chart the first repetition.
Including Stitch Counts

Showing the Number of Worked Stitches
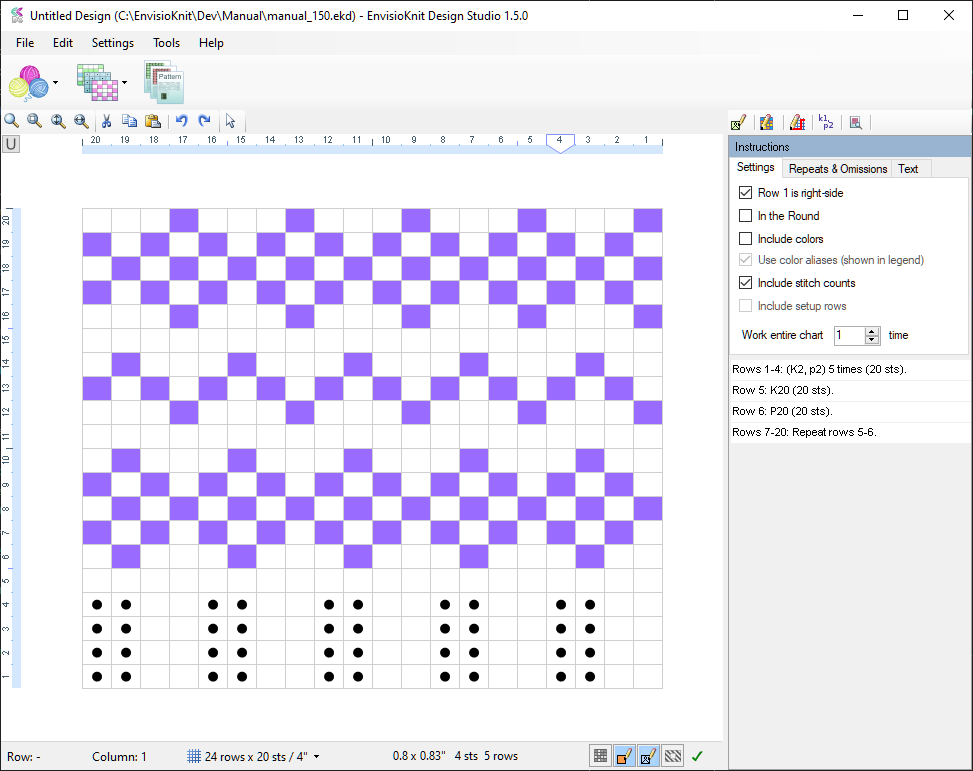
The number of worked stitches can be automatically included at the end of each row instruction. This option can be enabled by setting the Include Stitch Counts. Including the stitch counts in the written instructions can help the knitter check that each row has been worked correctly. The instruction count is shown in parentheses at the end of each row. For example, [K2, p2] 5 times (20 sts).
Repeated Sections

Repeated Chart Sections
You may want to generate the written instructions so that a section of a chart is repeated, but the rest of the chart is not. You can do this with repeated sections.
To mark a repeated section, select the area and right-click on it. Select Repeat Selection from the menu that pops up and the Repeat Settings window will appear.
Specify the number of times that the selection should be worked and click OK. The written instructions will be automatically regenerated to reflect your settings. Also, because you are changing how the chart is worked, the Chart Checker will be updated as well.You can mark non-rectangular and non-connected selections as repeated sections. Overlapping areas will be merged together. The Undo and Redo commands work for adding repeats, so you can use them to revert unwanted changes.
Repeat Settings

Repeat Settings
Each repeated section has settings that you can adjust to configure how the associated written instructions are generated. The Repeat Settings specify the following properties:
- The number of times that a repeat is worked.
- If the repeat should be outlined with a border line.
- If the literal sequence of repeat stitches should be preserved, as marked by the selection, in the generated stitch instructions. This can optionally be done only on patterned rows (i.e. not all knit or all purl). Additionally, the marked sequence text can be set to appear in a bold typeface in the written pattern.
Omitted Sections

Omitted Chart Section
You can mark areas of your chart to be omitted from the automatically generated written instructions. The instruction generator will simply skip over them. This can be used for many purposes, but generally it is to show things on the chart that are not meant to be worked literally.
Omissions can be added and modified on the Omissions tab. As with repeated sections, to mark an omitted section, select the area (with the select tool) and right-click on it. Select Omit Selection in the menu that pops up. The written instructions will be automatically regenerated to reflect your settings and the Chart Checker will re-validate the chart.
You can have multiple omitted sections. Select additional areas and click the Omit Selection button. Overlapping areas will be merged together. The Undo and Redo commands can be used to revert unwanted changes. Repeated and omitted sections can overlap, the omissions will take precedence.
To remove an omission, right-click on the area in the chart and select Remove Omission from the menu that appears.
Repeat Overlays and Appearance

Overlay Settings
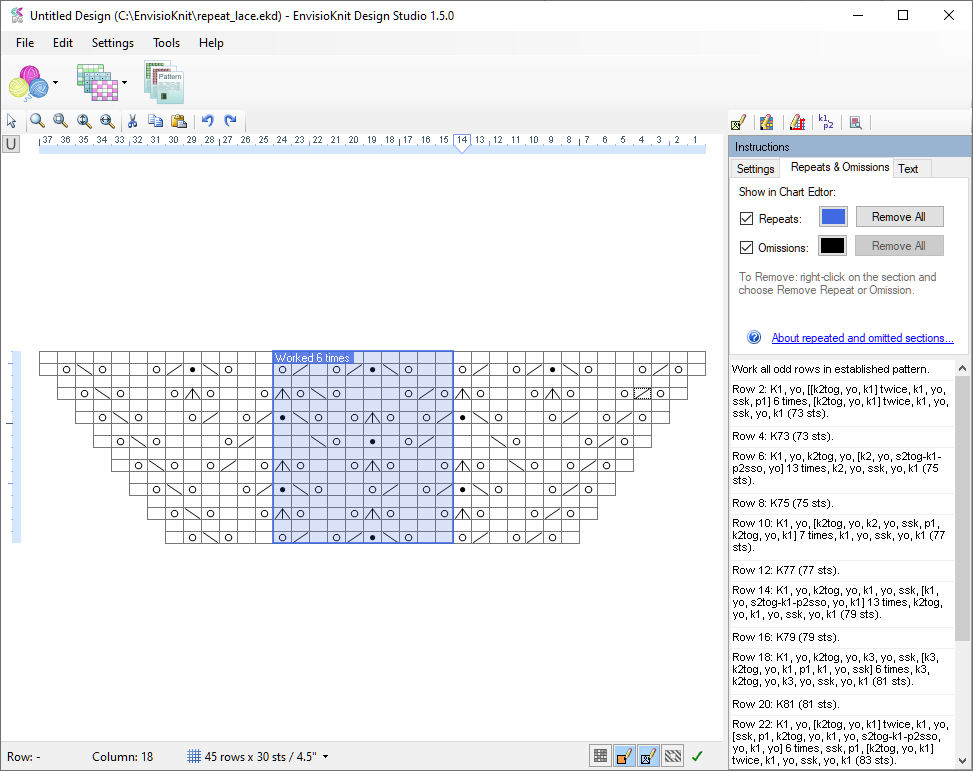
A tinted overlay is shown to visually indicate the location of repeats and omissions in the Chart Editor. This is for your reference while you design, so that you can clearly see where the repeat is. The overlay will not appear in the final exported chart. You can configure the appearance of the overlay on the Repeats & Omissions tab (on the right, above the instructions). Under Show in chart, uncheck Repeats to not show the repeat overlay in the chart editor. Alternatively, you can change the color to one that works better for you. Likewise, uncheck Omissions to disable the omissions overlay.
If you want a visual indicator of a repeat shown on the exported chart, visible to the knitter, you can automatically add a border line to your repeat by enabling it in the repeat settings. The border line will be automatically drawn to outline your repeat and will sync with your repeat shape if you change it later. Alternatively, you can manually draw a border line around your repeat using the border tools.
Instruction Text Options

Text Options
The Text tab contains a few more options for the instruction text. The Pattern Text Settings and Chart Numbering buttons are fairly self-explanatory. The Right-side rows option allows you to specify which rows should be read as right-side. In the vast majority of cases, this should be set to the default Right-to-left rows are right-side. This is the convention for hand knitting charts. However, if you are adapting your pattern for loom or machine knitting, the All rows are right-side setting will generate right-side stitch instructions on rows that are worked both right-to-left and left-to-right. The Left-to-right rows are right-side setting parses the chart left-to-right on right-side rows and right-to left on wrong-side rows, for left-handed knitting.