EnvisioKnit User's Manual
Download a print-friendly version (PDF).
Table of Contents
- Getting Started
- The Chart Editor
- The Pattern Editor
- The Yarn Studio
- Stitches
- Printing and Exporting
- Settings
- Tools
- Hotkeys and Shortcut Keys
- Other Features
Creating Charts from Written Stitch Instructions
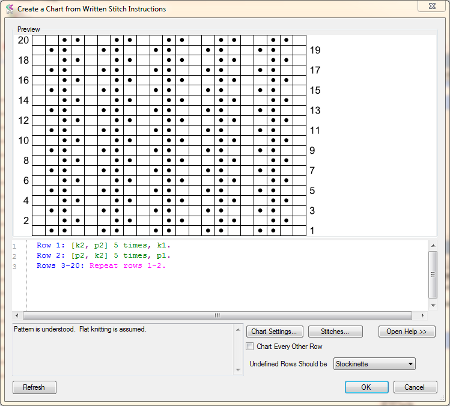
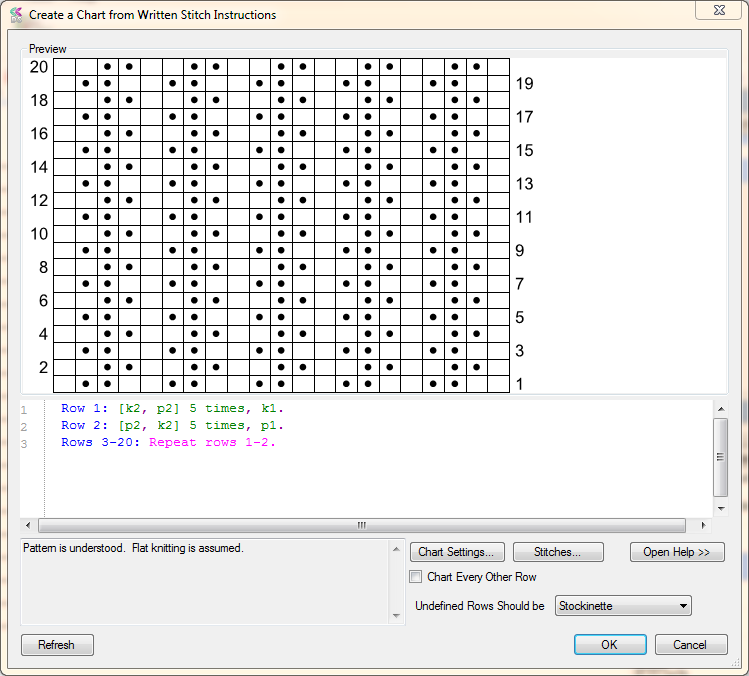
Create a Chart from Written Instructions
Example Shown:
Row 1: [k2, p2] 5 times, k1.
Row 2: [p2, k2] 5 times, p1.
Rows 3-20: Repeat rows 1-2.
EnvisioKnit has a special tool for generating charts from knitting stitch instructions. This tool is very useful if you have an existing pattern in written form that you would like to bring into EnvisioKnit as a chart. You can find the Chart from Written Instructions tool under Tools->Create Chart from Written Instructions... in the main menu.
When you open the tool, you will initially see a blank preview area at the top and a text editing area below. There is a status area at the bottom left of the window, and a settings area at the bottom right. The preview will automatically update as you enter stitch instructions in the text area.
The stitch text you enter is "parsed", or interpreted by the program. If there are no errors, a draft chart is constructed and shown in the preview. The parser will wait for you to stop typing momentarily before re-parsing and updating the chart. If the parser finds errors in your instructions, the status area will turn red and list the errors. To force an update, click the Refresh button in the lower left corner.
Stitch Syntax Rules
In order for EnvisioKnit to understand your stitch pattern, the format of the written instructions must conform to certain rules. If the program cannot parse or understand the entered text, it will indicate this with a message in the status area, and will also underline the problematic text in the text editor. The whole pattern must be understood and error free before a chart can be generated.
- Stitches must exist in the Stitch Palette.
- The stitch abbreviation will be used to match a written stitch to a charted stitch. Matching is not case sensitive.
- The stitch must exist in the stitch palette for the current design.
- If you need to add a stitch to the palette, click the Stitches..." button and add it there.
- Stitches must be separated by commas.
- Semi-colons are treated as commas.
- Whitespace before and after the stitch name is ignored.
- Each row instruction must be on a separate line.
- Periods are optional at the end of lines. Periods within the line will be treated as commas.
- Repeats of a single stitch must be written directly after the repeating stitch, i.e. "k2tog 3 times" or
"k2tog 3x".
- Knit and purl stitches are special and can be written with the repeat number appended to the stitch abbreviation, i.e. "k20" or "p20".
- Repeats of 2 can be written "twice", i.e. "k2tog twice".
- Repeats of multiple stitches must be enclosed in square brackets and followed by the number of repeats, i.e.
"[k2, p2] 10 times".
- Like single stitches, the repeats must be of the format "5 times" or "5x" and "twice" can be used instead of "2 times".
- Repeats of single or multiple stitches can be nested within larger repeats of multiple stitches.
- Row instructions can be labeled with a row or round number, i.e. "Row 1: k20."
- If the first row does not have a row number, it will be numbered row 1. Subsequent unnumbered rows will be numbered sequentially.
- The same number cannot be assigned to multiple rows.
- For circular instructions, use the label "Round" instead of "Row", i.e. "Round 1: k20."
- If any row is labeled "Round", then the full pattern will be interpreted as a circular pattern. Otherwise, flat knitting is assumed.
- You can indicate that the first row is a wrong-side row by adding "(WS)" to the row label, i.e. "Row 1 (WS):
p20."
- If the first row is not labeled with "(WS)", it will be a right-side row.
- Only the first row may be labeled with "(WS)". If subsequent rows use the label it will be ignored.
- A row instruction can define multiple rows, which have identical instructions. For example: "Rows 1-10:
K20."
- For circular knitting, use "Rounds" instead of "Rows", i.e. Rounds 1-10: K20.
- A set of non-sequential rows can be labeled with commas between row numbers, i.e. "Rows 1, 5, 9: P20."
- A row instruction can refer to a previous row. For example: "Row 3: Repeat row 1."
- A row instruction can also refer to a range of previous rows. For example: "Rows 11-20: Repeat rows 1-10."
- Charts will begin with the first defined row and end with last one.
- Undefined rows within this range will be charted as determined by the Undefined Rows setting.
- The default setting for Undefined Rows is stockinette.
-
Colorwork can be included in the written instructions by specifying the name of the yarn after the stitch,
in the following syntax: k2 in White, k2 in Blue, p1 in Green.
- Single-letter alphabetic aliases can be used instead of yarn names, for brevity. The letter A will correspond to the first yarn in the yarn palette, B to the second, then C and so forth. For example: k2 in A, k2 in B, p1 in C.
Settings
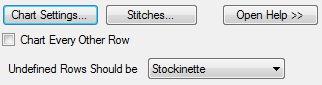
Chart Creation Settings
The settings for the Chart from Written Instructions tool are located at the bottom right of the window.
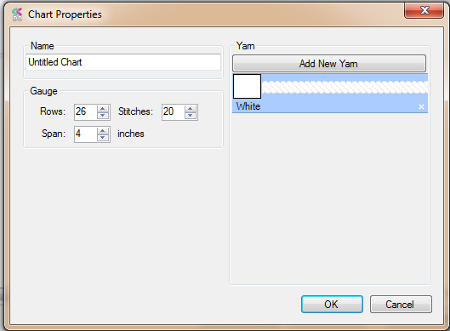
Set the Chart's Name, Gauge, and Default Yarn
The Chart Settings button opens a window where Name, Gauge and Default Yarn of the chart can be set.
The Stitches... button opens the current stitch palette so that you can add or modify stitches if necessary.
If you would like to create a chart in which only alternate rows are charted (i.e. for cables or lace where alternate rows are plain) then check the Chart Every Other Row box.
Your written instructions may not define every row within the chart. Undefined rows will be charted as determined by the Undefined Rows setting. The options are Stockinette, Blank, Skipped and Renumbered, Knit Across, and Purled Across. Stockinette will set undefined rows to stockinette stitch, so right side rows will be knit and wrong side rows will be purled. Blank will set undefined rows to the invisible (background) no-stitch. Skipped and Renumbered will skip undefined rows, renumbering subsequent rows to follow previous rows sequentially. Knit Across will set undefined rows so that they are worked as knit rows, whether they are right-side or wrong-side. Purl Across will set undefined rows so that they are worked as purl rows, whether right-side or wrong-side.
Examples
The following four examples all produce 10 rows of 20 stitches of stockinette:
Example 1
k10, k5, k1, k4.
p20
k4 5 times
[p4,p2,   p4] twice.
k10 2x.
p20
[[k1, k1] 2 times] 5 times
p20
k20
p20
In example 1, row numbers are not specified, so the first row is assumed to be 1 and the following rows are numbered sequentially from there. The first line shows that stitches may be separated by commas. Whitespace between stitches is optional and effectively ignored by the parser. Periods at the end of lines are optional. The third line in example 1 illustrates that stitches may be repeated by specifying "5 times" after the stitch, where 5 can be replaced by any number of repeats. The fourth line shows that several stitches, "p4,p2, p4" can be repeated as a set using square brackets [], and that "twice" can be optionally used instead of "2 times". The fifth line demonstrates that the syntax "2x" can be alternatively used to "2 times". The seventh line shows that repeated sets can be nested within larger repeated sets. Any stitch abbreviation defined in your current stitch palette may be used. Only knit and purl stitches may use the syntax k20 or p20, where 20 is the number of times to work the knit or purl. Instead, repeats of other single stitches should be indicated using the "twice", "2x" or "2 times" syntax, for example "yo twice".
Row numbers are optional. Example 1 does not use any row numbers, but the other examples do. Lines may optionally be prefixed like so: "Row 1:" or "Round 5:", where the number must be included. If at least one line is prefixed with "Round", then the instructions will be interpreted as being knit in the round, otherwise they will be interpreted as flat knitting. The first row is assumed to be a right-side row. If rows are written without prefixes, they are numbered sequentially from the previous rows. An unnumbered first row is assumed to be Row 1.
Example 2
Rounds 1-10: k20.
In example 2, the prefix "Rounds" is used to indicate that the instructions should be interpreted in the round. Examples 2 and 3 show that one line may specify the instructions for a a set of rows. The syntax for this is "Rows 1-10:", where 1-10 may be any range of rows that have not yet been defined, and "Rows" may be replaced with "Rounds" if the chart is worked in the round.
Example 3
Row 1: k20.
Row 2: p20.
Row 3-10: Repeat rows 1-2.
In example 3, the third line specifies a range of rows, 3-10, that should repeat a set of previous rows, 1-2. Example 3 defines a range of 8 rows that repeats a previous set of 2 rows. The syntax for this is "Repeat rows 1-2", where 1-2 may be replaced with any range of rows that have been previously defined in the instructions. If the chart is in the round, then "rows" may be replaced with "rounds".
Example 4
Row 4 (WS): p20.
Row 5: k20.
Rows 6-13: Repeat rows 4-5.
In example 4, the first line is marked as Row 4, so the first row of the chart will be labeled "4". It is also marked as a wrong-side row, using the "(WS)" tag before the colon. Only the first row of the chart should be marked right-side or wrong-side via the tags (RS) or (WS). Use of these tags on any other row will be ignored.