EnvisioKnit User's Manual
Download a print-friendly version (PDF).
Table of Contents
- Getting Started
- The Chart Editor
- The Pattern Editor
- The Yarn Studio
- Stitches
- Printing and Exporting
- Settings
- Tools
- Hotkeys and Shortcut Keys
- Other Features
Stitches
Stitch Palettes
Selecting a Stitch Palette
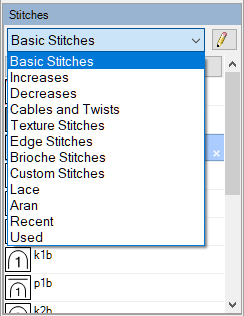
EnvisioKnit stitches are organized by type into stitch palettes. The built-in stitch palettes are Basic Stitches, Increases, Decreases, Cables and Twists, Texture Stitches, Edge Stitches, Brioche Stitches and Custom Stitches. There are also two automatically generated palettes: Recent and Used. In addition to these, designers may create their own "designer" palettes to organize sets of stitches according to their preferences. The Aran and Lace palettes are designer palettes that include a variety of stitches specific to those types of knitting charts.
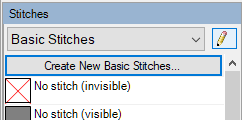
The current stitch palette can be chosen by selecting the name of the palette from the drop-down list at the top of the stitch selector. The stitches contained in the current palette are listed below. The current stitch can be selected by clicking on it in the list. It will be highlighted to indicate that it is selected.
All stitches are fully customizable. The abbreviation, instructions and symbol for any stitch can be modified. To edit a stitch, double-click on it in the stitch palette. The Stitch Properties window will appear to allow you to make these changes.
A stitch can be removed from a palette by selecting it and then clicking the 'X' icon that appear in its bottom-right corner. Any stitch in the list can be reordered by clicking on and dragging it to the desired position.
Built-In Stitch Palettes
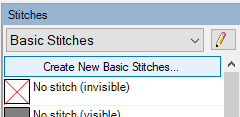
Create New Stitch button
The built-in stitch palettes contain a set of the most commonly used stitches by default. However, you can add additional ones or create your own fully custom stitches. Each of the built-in palettes has a "Create New..." button at the top of the palette. Clicking it will open a tool to add stitches to the palette. The tool is different for each palette and specific to the type of stitch.
Basic Stitches
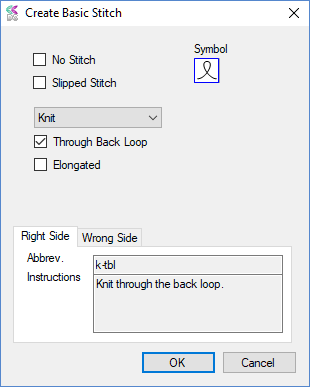
Making new basic stitches
The basic stitches include knit, purl, no-stitch, slip one, knit through the back loop, knit one below, and many others. In general, they are single stitches that do not involve increases or decreases.
The Create Basic Stitch tool has several options. You can create a No-stitch, a knit stitch, purl stitch, slip stitch, a stitch that is worked through the back loop, a stitch that is elongated by wrapping the needle additional times, and many combinations of these.
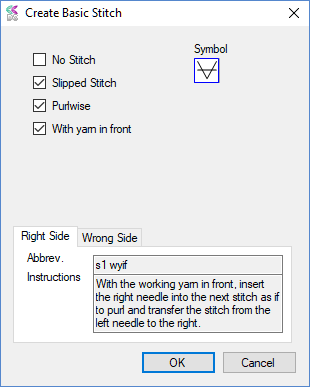
Slipped stitch selected
You may discover particular selections will change your options appropriately. For example, if you check Slipped Stitch new options will appear for slipping the stitch purlwise or with the yarn in front.
A stitch symbol, abbreviations and instructions for the stitch are automatically generated. If you wish, you can customize them later after clicking OK and adding the stitch to your palette.
Increases
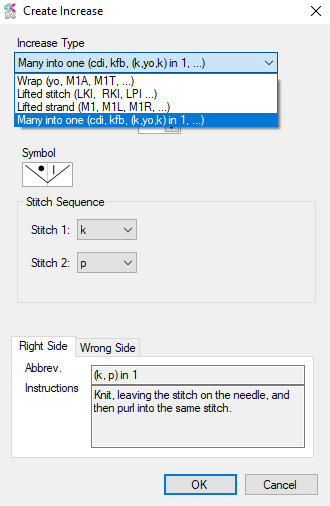
Increase stitch options
The increase stitch palette contains yarn over, make one, lifted increases, knit front and back, various permutations of those and more. More specific stitch options become available depending on which general type of increase you select.
Wraps are increases such as yarn-overs in which the working yarn is wrapped around the needle to create additional loops. Lifted stitches are increases made by lifting a stitch from the previous row and working into it. Lifted strand increases involve lifting and working into the strand running from the last stitch to the next stitch. Many into one increases are stitches that work several stitches into the next stitch by alternating the stitch type (front/back, knit/purl, knit/yo/knit, and so on).
Decreases
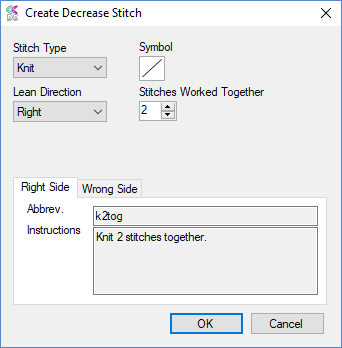
Decrease stitch options
Stitches which create one stitch from many are found in the Decreases palette. The decrease stitch options allow you to set the Stitch Type (knit or purl), the Lean Direction (right, left or centered) and the number of stitches worked together.
Cables and Twists
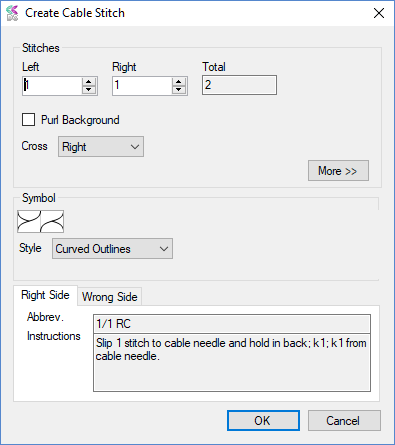
Cable stitch options
Cables and Twists are stitches involving multiple loops that cross one another in various ways. This palette is populated with several of the simpler and more common stitches of this type.
New cable stitches can be made by selecting the number of stitches on the Left and Right sides, the direction of the cross and whether the stitches crossing in back should be purled. Clicking the More >> button will give the additional option of specifying middle stitches. The cable symbol style can be specified, and the options are curved outlines, straight outlines, and crossing lines.
Texture Stitches
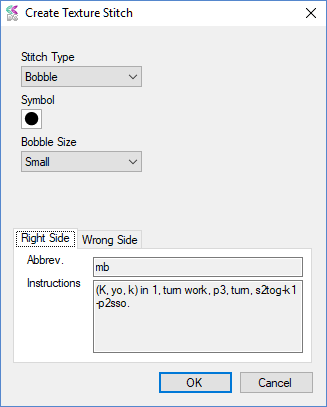
Texture stitch options
Texture stitches are stitches that pop out from the knitted fabric. The Stitch Types include bobbles, nupps and cluster stitches. Detailed options specific to each type will appear when you select the stitch type.
Edge Stitches

Edge stitch options
Edge stitches deal with the bottoms, tops, or sides of the knit fabric. They are cast-on, bind-off and wrap and turn stitches.
Brioche Stitches
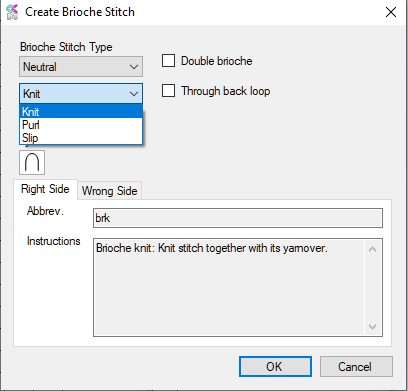
Brioche stitch options
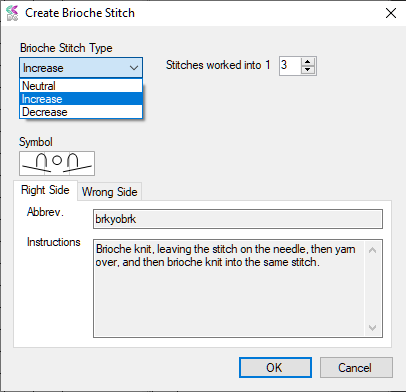
Brioche increase options
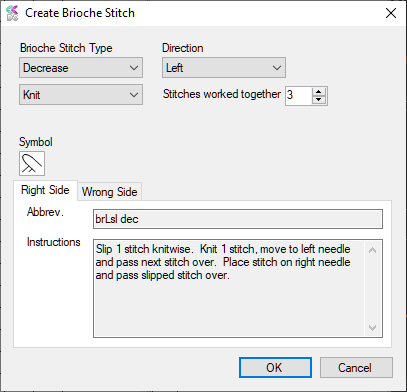
Brioche decrease options
Brioche stitches are used for brioche knitting charts. Brioche knitting is a slipped-stitch technique, recently popularized by Nancy Marchant. Brioche Stitches include the brioche basics (brk, brp and sl1yo), as well as brioche increases (brkyobrk, br4st inc, etc...), decreases (brRsl dec, brLsl dec, br4st dec, etc...), and cables.
Custom Stitches

Creating custom stitches
The custom stitch palette contains stitches that you create, and is empty by default. Custom stitches are fully configurable. You specify the abbreviation and instructions, right side and wrong side. You also set the symbol and the number of cells that the stitch should occupy on the chart.
The Stitches taken and Stitches made settings are by default both equal to the number of cells that the stitch uses. Stitches taken refers to the number of stitches worked into on the previous row (taken from the left needle). Stitches made is the number of new stitches made (put onto the right needle) when the stitch is worked. If the stitches taken equals the stitches made, then the stitch is neither a decrease nor an increase. However, if the stitch takes more stitches than it makes then it is a decrease. If the stitch takes less stitches than it makes it is an increase.
The stitch counts that are optionally included in the written instructions use these settings to determine how many stitches will be on the needle when the row has been worked. The Chart Checker tool also uses these settings to determine if the number of stitches taken by one row equals the number of stitches made on the previous row, and thereby determine if the chart has errors that would make it unknittable.
Automatic Stitch Palettes
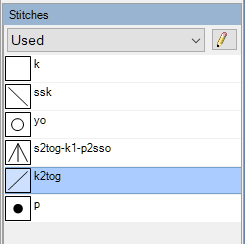
Used stitch palette
EnvisioKnit automatically populates two stitch palettes: Recent and Used. The Recent palette is initially empty and contains the last 10 stitches you have selected (by clicking them) in the stitch palette. The Used palette contains all the stitches used in the current design and it is dynamically updated as you work. Once you have established your designs, you may find it more convenient to work from these palettes than to switch back and forth between the built-in palettes to select stitches of different types. Since they are automatically generated, the Recent and Used palettes are not editable and are always the last palettes in the palette list.
Designer Stitch Palettes
Stitch Palette Editor button (pencil)
You can create designer stitch palettes and add them to the list of built-in and automatic palettes. Designer stitch palettes can contain any stitch from any of the other palettes, including custom stitches. They are a convenient way to organize stitches that are frequently used together in a particular context.
Two designer stitch palettes are added by default: Aran and Lace. Aran contains the basic knit and purl stitches as well as a selection of cables, and Lace contains the basic stitches, yarn-over and a set of decreases.
Adding a new designer palette
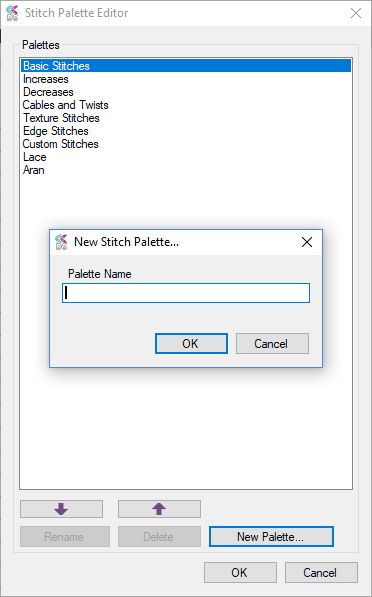
To create a new designer palette, click the button with the pencil icon to the right of the palette list drop-down. The Stitch Palette Editor will appear. Click New Palette... and enter a Palette Name. Click OK and your palette will be added to the list.
The Stitch Palette Editor also allows the list palettes to be ordered according to the designer’s preferences. To move a palette, first select it in the list, then use the arrow buttons to move it up or down.
Designer palettes may also be renamed or removed from the palette list. The built-in palettes (Basic Stitches, Decreases, Increases, etc.) are fixed and may not be renamed or moved, but may be reordered.