EnvisioKnit User's Manual
Download a print-friendly version (PDF).
Table of Contents
- Getting Started
- The Chart Editor
- The Pattern Editor
- The Yarn Studio
- Stitches
- Printing and Exporting
- Settings
- Tools
- Hotkeys and Shortcut Keys
- Other Features
Editing Stitch Properties and Symbols
Any stitch in the stitch palette can be customized. The stitch symbol, abbreviations and instructions can be modified by editing the stitch properties.
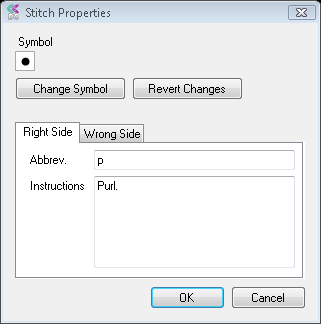
Stitch Properties
To open the stitch properties for a given stitch, double-click on the stitch in the Stitch Palette.
The stitch properties allow you to set the abbreviation and instructions text for both the right-side and wrong-side (the reverse side) of the stitch. The stitch symbol can be changed by clicking the Change Symbol button, which will open the Symbol Editor.
If you decide that you are not happy with your customizations, you can always revert the stitch to its out-of-the-box default settings by clicking the Revert Changes button.
To modify or add a stitch so that it is in your stitch palette by default whenever you create new designs, you can make your changes in the default stitch palette. Go to the main menu and select Settings->Default Settings... The Default Settings window will appear. Select the Stitches tab, and then add your new stitches or make changes to the existing ones (double-click on a stitch to change it). Click OK and your default settings will be saved. When you create a new design, your customizations will appear in the palette. Existing designs will not be affected by your changes to the default palette, because each design file contains its own stitch palette so that stitches can be customized independently for each design. See Default Settings for more information about default design options.
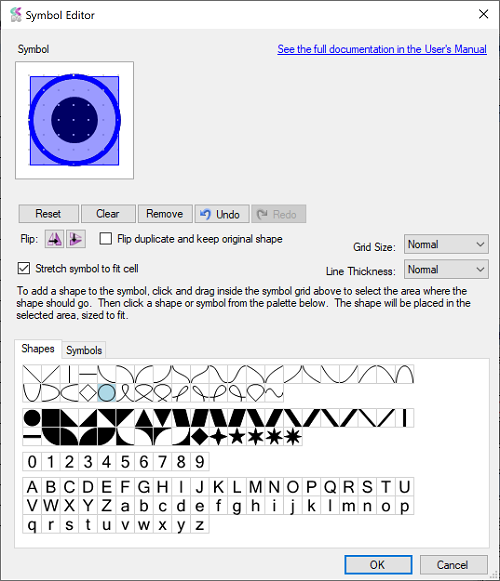
Symbol Editor
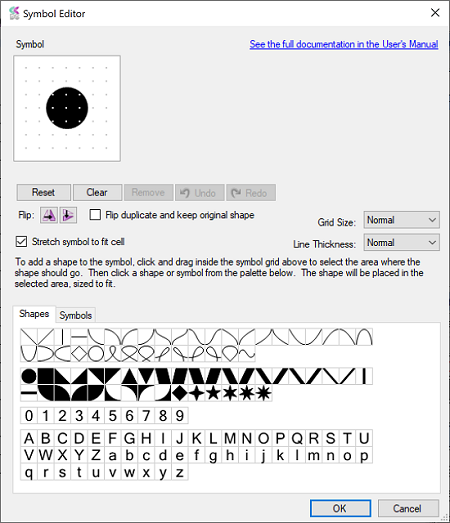
Symbol Editor
The symbol editor is a drawing tool for stitch symbols. You can use it to make changes to any stitch symbol or create an entirely new one. The tool provides a versatile palette of lines, shapes, text and symbol components that you can combine and manipulate to build your own stitch symbols.
The Symbol Box
The Symbol box is located at the top of the Symbol Editor and contains the symbol you are currently editing. To make the symbol box larger and easier to work with, expand the Symbol Editor window by dragging the lower right corner of the window.
Adding Shapes
To add a new shape to the symbol, first select the area you want to place the shape in the Symbol Box. Do this by clicking inside the symbol box and dragging to select an area. The selected area will be indicated with a blue box. Then, click on a shape from the palette below. The shape will be added to the symbol, sized and positioned to fit inside the area you selected.
Selecting Shapes
Individual shapes in the symbol box can be selected by clicking on them, or by dragging the selection box over them. Selected shapes are shown in blue and unselected shapes are shown in black. To select multiple shapes, hold the Shift or Control key while selecting additional shapes.
Moving Shapes
Selected shapes can be repositioned by dragging them with your cursor. They can be placed anywhere within the symbol, but cannot overlap the edges.
Removing Shapes
Click the Remove button to remove the selected shapes from the symbol.
Flipping Shapes
Shapes can be flipped by clicking the horizontal or vertical flip buttons (the small buttons with matching triangle icons). If one or more shapes are selected, the selection will be flipped in place. If no shapes are selected, the entire symbol will be flipped. To flip a duplicate of the shape(s), check the Keep original box.
Undoing Changes
If you need to fix a mistake, click the Undo button to revert your last change. Click Redo if you change your mind. All changes are reversible.
Clearing the Symbol
Click the Clear button to clear the entire symbol.
Resetting the Symbol
Click the Reset button to revert all your changes and go back to the original symbol that was loaded when you opened the Symbol Editor
Grid Size
When editing the symbol, you may require a finer grid to achieve the size and positioning you want. The Grid Size setting is set to Normal by default, but can be changed to Fine or Extra Fine.
Line Thickness
The Line Thickness setting for the symbol lines is set to Normal by default, but other options include Extra Fine, Fine, Thick, Extra Thick, 2x Thick and 3x Thick. This setting applies to all lines in the symbol.
Stretch to Fit
By default, most symbols are set to stretch to fit the entire stitch cell (or cells, in the case of cables and other stitches that use multiple cells) which is usually not perfectly square (it depends on your chart's gauge). If you do not want your symbol to be stretched, you can uncheck the Stretch symbol to fit cell checkbox.
Shape and Symbol Palettes
The shape and symbol palettes contain components that you can select and combine to create your symbols.
Under the "Shapes" tab, you will find basic shapes as well as letters and numbers that you can place and combine to create custom symbols.
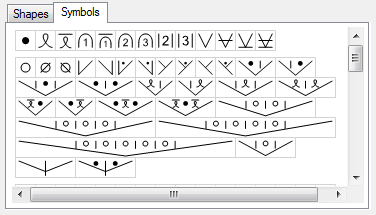
Symbols Tab
The "Symbols" tab contains every stitch symbol already in your stitch palette, so you can choose an existing symbol to use as part of your new custom symbol.
Creating New Symbols
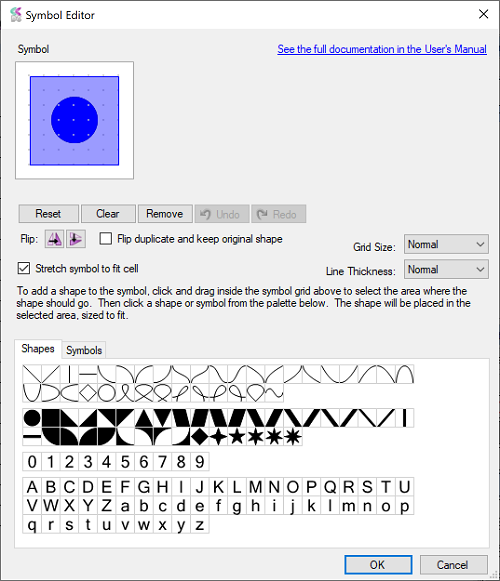
Select the area to place the new shape
To add a new shape to your stitch symbol, first select the area where the new shape should go. Click on one corner of the area inside the Symbol box, and drag the cursor to the opposite corner. The region you've selected will be highlighted in blue.
Click the shape to add
Now just click the shape you want in the palette. The open circle was clicked in the example shown on the right. The new shape will be positioned and sized to fit inside the area you have selected.
You can continue to add and combine shapes this way to build more complex symbols. If you make a mistake, you can click the "Remove" button and the last shape you added will be removed. To revert back to the original symbol click "Reset". Click the "Clear" button if you want to clear the entire symbol.